7 Design Principles of Landscaping

For example, trees shade homes and reduce air temperatures. Plants also produce oxygen and absorb carbon dioxide.

Stafford VA Landscaping is one of the best ways to increase your home’s value. It also provides environmental benefits and can lower energy costs.

To measure your yard, start with a square or rectangular lawn since these are the easiest shapes to calculate. Then, use a tape measure to record length and width.

Color

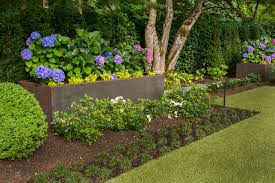
Color is a powerful design element that attracts attention and guides the eye. It is also used to evoke emotions and enhance a sense of balance. When used effectively, it can create focal points, unify different areas of the landscape and create a seamless transition between the home and garden.

Warm colors such as reds and yellows are energizing and make great accents for areas where you want to encourage interaction. Cooler colors such as blues and purples are calming and are ideal for quiet spots like meditation gardens or hidden retreats.

Incorporating monochromatic colors (using shades, tints and variations of a single color) into your landscape creates a harmonious design with limitless creativity. For example, using red roses and sedum in the same bed provides both contrast and harmony.

Form

Form refers to the three-dimensional qualities of your landscape, including the shape of plant materials and hardscape structures like outdoor structures and paths. The type of form you choose depends on your overall landscape theme and horticultural goals. For example, a formal garden may use plants with tailored shapes like clipped hedges while an informal space will include more natural or flowing shrubs.

Lines also have a great impact on how your landscape looks. Straight lines create a more formal, structured character and are often associated with symmetry. On the other hand, curved lines provide an organic, relaxed feel and can help to move the eye around a landscape.

Texture is a design element that can be perceived by touch as well as vision. Rough or smooth, coarse or fine—texture is an important aspect of a landscape because it adds contrast to your design and creates texture in the soil, plant cover and hardscape materials like brick or concrete. When used in mass, a landscape with one texture can feel stark and formal while using a mix of textures will add a soft, textured feel.

Pattern

Incorporate geometric paving patterns into your landscape design to enhance the structural integrity of your outdoor space. A herringbone pattern is particularly well-suited for properties that strive to convey a sense of minimalist beauty, complementing architectural styles that emphasize symmetry and refinement.

Semantic patterns can be used to establish a narrative in your outdoor environment, evoking an emotional response and establishing a theme or character for the space. For example, arranging plant rows according to the Fibonacci sequence allows landscape architects to mimic natural growth patterns, promoting ecological efficacy and visual harmony.

A circle is a testament to the timeless beauty of curves, offering a softer contrast to the sharp angles often associated with modern landscape architecture. From residential pathways to upscale commercial areas, circular paving patterns provide a subtle yet elegant aesthetic. Belgard’s concrete paving and landscaping materials are ideal for projects that require a sophisticated blend of form and function.

Light

Landscape lighting doesn’t just give your home curb appeal; it can actually help keep you and guests safe at night. If you have a pathway with steps or an uneven area, lining those areas with lights can show people where to walk and prevent them from accidentally falling. It can also add a warm, welcoming glow to your home, especially when inviting guests over for a dinner party or barbecue.

Using different types of light to highlight interesting plant and tree details can create a unique effect. For example, showcasing the color of tall flowers or trees with up-lighting is an effective way to illuminate them without making them too bright.

Another way to use lighting is to wash an entire wall or area with light. This is commonly done with garden lights on a deck or a staircase. Another technique is to “moonlight” trees, which gives the illusion of moonlight and creates a sense of ambiance in the yard.

Balance

Balance is a fundamental aspect of landscape design. It helps create a harmonious composition that feels comfortable and inviting to visitors. Whether achieved through symmetry or asymmetry, balance ensures that no one element dominates the overall design.

Considering scale is an important part of balance as well. This means ensuring that larger elements, like trees and boulders, are balanced by smaller elements, such as ground covers and shrubs. It’s also important to consider the visual weight of different elements. For example, warm colors often feel heavier than cool colors. Choosing colors that complement each other can help to create a sense of balance.

Landscape designers use a combination of balance and focal points to create cohesive and appealing designs. Using these principles can help you create a beautiful and inviting landscape that is perfect for your home. Just remember to keep things simple and don’t try to over-design your space. Balance is an essential element of great landscaping, and it’s something that almost anyone can master with a little practice.

Contrast

Contrast in landscape design highlights unique features and creates visual interest. It also helps create functionality by establishing focal points and guiding movement through the space. Contrast techniques include color, texture, scale and spatial arrangements.

The most obvious form of contrast is color. Using complementary colors like yellow yarrow and purple beardtongue draws the eye (and the hummingbirds). Varying plant textures also adds contrast. Pairing rough-textured rocks with finely textured grasses offers a tactile dimension to the garden. Color also changes with the seasons, making it important to consider how the palette will change throughout the year.

Iconic architectural landscapes like the Gardens by the Bay in Singapore and the Taj Mahal use contrasting elements to create engaging experiences. Cultural and historical themes also incorporate contrasting elements to highlight differences in style, purpose and tradition.

Rhythm

Rhythm in landscaping creates movement and a progression in the landscape design. It can be accomplished through repetition, variation, or a combination of both. It is the element that ties together different areas of the garden and evokes a sense of harmony in the space.

Repetition is one of the easiest ways to create rhythm in a garden. Repeating elements like lines, shapes, or colors can help establish a visual theme that unifies the landscape. However, too much repetition can cause monotony so it is important to balance it with variation and contrast.

Proportion and open spaces also provide landscape rhythm. Just as the rhythmic cadence of a drum beat adds repetition to the musical score’s theme, opening space allows for the repetition of landscape elements while adding contrast and establishing a flow.

When used effectively, rhythm in the landscape can captivate the eye and create a harmonious experience for visitors. Incorporating both sensory dimensions of the landscape – the gentle rustle of foliage, the trickle of water features and aural melodies from chirping birds – amplify this dynamic design principle.

Variety

One of the guiding principles of landscape design is “the right plant in the right place.” This means that each planting should be suited to its site and situation. This can reduce maintenance requirements and prevent plant diseases and pests from spreading. It also promotes healthy plants and provides habitat for wildlife.

Another principle is repetition, which creates unity by repeating a similar form or shape throughout the landscape. This can be done by using the same plant shape in each planting bed, maintaining consistent edging or grouping similar elements together (Figure 19-22).

A good landscaping plan utilizes line to organize space and guide the eye through the landscape. Line can be real or imaginary and can create a sense of movement or depth. The use of a variety of shapes, lines and textures helps to add visual interest to the landscape.

Finally, a good landscape should be simple. Keeping the landscape simple prevents it from becoming too chaotic and overwhelming. Simplicity also promotes harmony and balance and allows for flexibility in future changes to the landscape.

The Benefits and Drawbacks of Solar Panels

Solar panels are a great way to reduce your energy costs by producing free, clean power on your rooftop. They also boost your home’s value and offer a tax credit.

Solar Panels

Choosing the best solar panel brand depends on a number of factors, including price, energy needs, and aesthetics. Some brands are better suited for certain climates than others. Visit Website to learn more.

Solar panels harness the power of the sun to produce energy for your home. This is a clean energy source, as it doesn’t emit any greenhouse gasses during its production or use. It is also a sustainable energy resource, because there is no need for mining or refining fossil fuels to obtain it. However, there are some drawbacks to solar energy, including the manufacturing process, the materials used and its disposal.

The solar cells in your home’s panel are a type of semiconductor that converts sunlight into electricity using photovoltaic effect. The semiconductor is made of a series of layers, with each layer having an n-type layer with an excess of electrons and a p-type layer with a deficit of electrons. The electrons are knocked loose by the light, allowing the semiconductor to generate electricity. The electricity generated by your solar system can be used to power all your appliances and lighting in your home. You can also feed any extra electricity into the main power grid for others to use.

Another benefit of solar energy is that it doesn’t create air pollution, which can lead to health problems such as chronic bronchitis and respiratory and cardiovascular issues. Widespread solar adoption would reduce nitrous oxides, sulfur dioxide and particulate matter emissions, which contribute to climate change and can worsen the effects of natural disasters.

One other benefit of solar energy is that it does not require much water to generate electricity, which is a major advantage in regions with water shortages and drought conditions. This is in contrast to traditional power plants, which require large amounts of water for cooling and other processes.

Many local governments offer additional tax benefits for homeowners who install solar panels on their property. These incentives can reduce the cost of solar panels and make them more affordable. These benefits include solar investment credits, rebates and property tax exemptions. Some of these incentives complement federal initiatives, creating a more tailored approach to incentivizing solar adoption.

Solar panels are a powerful energy source that can help you become energy independent and save money on your electric bill. They can also add value to your home and increase your home’s energy efficiency. Furthermore, they are easy to maintain and have a long lifespan of 25-30 years. Moreover, the materials used in solar panels are recyclable and can be reused again.

They’re affordable

Solar panels are a great investment in renewable energy for both homeowners and businesses. They can save money on electricity bills and add value to a property. Additionally, they can reduce greenhouse gas emissions and air pollutants. They also help conserve water and preserve biodiversity. In addition, they can be used in a process known as net metering to sell excess electricity back to the grid.

When shopping for solar panels, it is important to compare the wattage output, efficiency, size, and price of different models and brands. This will allow you to find the best fit for your home or business. Additionally, you should consider any available government incentives or rebates that could lower your purchase cost.

The price of a solar panel is largely determined by the materials and components that it uses. Cheaper solar panels are typically made from lower-grade components and are more prone to breakdowns and failures. They may also be less efficient at converting sunlight into electricity than more expensive panels. Therefore, it is important to choose a reliable brand that offers a comprehensive warranty and good customer service.

A solar panel’s efficiency is determined by the number of cells it contains, its size, and its power-producing capacity. Larger panels with more cells tend to be more efficient, as they can absorb and convert more sunlight into electricity. Additionally, a solar panel’s efficiency is impacted by its color, as darker panels absorb more light and produce more energy.

When choosing a solar panel, you should also consider the type of silicon it uses. Polycrystalline solar panels are cheaper to manufacture than monocrystalline, as they use silicon fragments rather than a single, pure crystal. They are also more durable than cadmium telluride or crystalline silicon solar panels.

Another important factor to consider when shopping for a solar panel is the amount of maintenance required. While most solar panels are fairly maintenance-free, they should be kept free of debris and cleaned regularly to ensure proper function. Some solar companies offer maintenance services, while others provide warranties that cover repairs.

They’re durable

Solar panels are an important investment that can save you money over the long term. However, there are some factors that can affect their durability. For example, dirt can interfere with the panel’s ability to produce energy and may lead to a drop in performance. This is especially true if you live in a dusty climate or near industrial sites. In addition, the type of adhesive used to mount the junction box is critical for the longevity of the module. New advances in liquid and tape adhesives help to reduce moisture penetration and prolong the lifespan of the modules.

The best solar panel brands offer high efficiencies, durable construction and trusted warranties. They also use innovative technologies like PERC and bifacial solar cells, enabling them to maximize energy production even in challenging conditions.

In fact, many of the world’s leading solar panel manufacturers conduct extensive testing on their products, including a rigorous test to determine how much power they can generate under varying weather conditions. This testing process typically involves exposing the panels to a variety of weather conditions, from high winds to hail. Generally speaking, solar panels are resilient and can resist damage from most natural disasters.

Another factor that impacts solar panel durability is the temperature. Hotter temperatures can cause the materials in solar panels to degrade faster than normal, which may shorten their lifespan. This is why it’s important to install a solar panel system that’s well insulated and designed for your specific climate.

Fortunately, if you install your solar panels correctly, they can last for decades without any major problems. Most of the time, your system will only require minor maintenance like cleaning, snow removal and debris removal. If you want to increase your system’s longevity, be sure to choose a reliable installer with years of experience and glowing reviews from past customers.

The main advantage of solar panels is that they are a clean, renewable energy source. They eliminate the need for fossil fuels, which produce harmful greenhouse gases and increase our dependence on foreign oil. They also decrease the amount of energy we consume in our homes, which is good for our environment and our wallets.

They’re easy to install

While it’s possible to install solar panels yourself, the process is usually more time consuming than most people realize. This is especially true if you have a large rooftop, as you’ll need to build scaffolding and follow safety measures. Additionally, you’ll have to get the right equipment and permits, which is why it’s generally best to leave this project to professionals.

Before starting the installation process, you’ll need to calculate your energy needs. This will help you determine how many solar panels you need and what size of system will be adequate for your home. You can use our solar sizing tool to help you with this step. It’s important to note that the system size should be based on your current and future energy usage, not just your current electric bill.

Once you’ve determined your energy requirements, it’s time to start planning the layout of your solar system. Make sure that the location has sufficient sunlight throughout the day, and remove any obstructions that may cast shadows on the solar panels. Also, consider the local weather conditions and any financial incentives that may be available.

The next step is to prepare the site for the solar panel installation. If you’re using a ground mount, this will require some excavation and trenching to comply with the National Electrical Code. It’s wise to rent machinery that can dig trenches and anchor holes to speed up the process. Once the metal substructure is built, you can begin to install your solar panels. Secure the racking rails to the support structure, and then secure each solar panel to its rail using the clamps. Remember to leave a space of 10 mm between each module to allow for linear thermal expansion.

Next, connect the PV modules to the inverter using MC4 connectors and junction boxes. You can choose to connect them in series or parallel, depending on your system design. In a series connection, the positive (+) wires of each panel are connected to the negative (-) wires of other panels. This type of wiring increases the voltage, while maintaining current.

Mold Removal – What You Need to Know

Mold is a common household problem that can be hard to eliminate. It grows as a fungus that thrives in moist conditions.

The spores you see are the fruiting bodies of this fungus. Luckily, by addressing the root cause, it is possible to kill the mold and prevent it from coming back. Contact Mold Removal In Brooklyn now!

Moisture is the key ingredient for mold growth, so you must fix whatever is causing it to clean up the problem. That can be as simple as fixing a leaking pipe or as complicated as tearing down and replacing walls, insulation, and flooring. It would be best if you also cleaned the affected areas and replaced any items that can’t be washed or re-used. A professional restoration service may be necessary if you have a serious mold problem.

Before you begin to clean, however, it’s important to protect yourself from the spores that are released during mold removal. The EPA recommends wearing rubber gloves, goggles and a mask that is labeled N95.

Once you have your protective gear on and have identified the source of moisture, it’s time to start cleaning the moldy area. Start by wiping the mold with a damp cloth or sponge. Rinse the cloth or sponge often and continue scrubbing until you can no longer see or smell the mold. Be sure to scrub porous surfaces like drywall and wood, as well as rugs and carpeting, to remove any hidden spores.

If the spores persist, spray them with a commercial mold killer such as chlorine bleach or distilled white vinegar, and wipe again. The acetic acid in the vinegar will kill the remaining mold spores and make it impossible for them to grow back.

After you have cleaned all the surfaces that can be safely cleaned, set out dehumidifiers and fans to dry the areas for three days. After that, test the area by sight and smell for any new mold growth. If you can’t find any, it’s safe to use your home again.

In many cases, a few splotches of surface mold can be a warning sign that there is an ongoing water or humidity problem that needs to be addressed. For severe mold problems, a professional remediation company should be used to ensure the fungus is completely removed and that the moisture issue has been resolved. They can repair any damaged areas and help you get your home or business back to normal as quickly as possible.

Cleaning the Surfaces

After a thorough inspection, the next step is to clean any areas where mold has grown. This process should always begin with removing the source of moisture, as well as addressing any building materials affected by the water intrusion or mold. Mold spores can also spread to other areas of the home, so addressing the root cause of the problem is important.

After the area has been cleaned, it is essential to thoroughly ventilate the space to avoid re-infection with mold spores. This can be done by opening windows and running fans. The use of a deodorizer can help to get rid of any musty odors caused by the mold growth. The last step is to replace any materials that have been permanently damaged or contaminated by the mold.

Depending on the type of mold you are dealing with, different cleaning methods may be necessary. For example, black mold (Stachybotrys) is typically very toxic and requires a professional to remove. This type of mold tends to grow in moist, dark areas, such as inside walls or under floors.

The best approach to cleaning mold is to remove any visible growth and resurface the area with a suitable coating, such as epoxy paint. This will prevent the mold from growing back and provide a healthy environment. For surfaces with stubborn stains, a mixture of vinegar and hydrogen peroxide can be used to effectively kill the mold and remove the stain.

When cleaning moldy surfaces, it is important to wear personal protective equipment, including a face mask with vent holes, rubber gloves and goggles. This will prevent any mold spores from getting in your eyes or on your skin, and it will also protect you from any burns or irritation from cleaning solutions.

For most areas, a good scrub brush, rubbing alcohol, water and detergent can be used to effectively clean the surface of any impacted areas. After scrubbing, it is important to rinse the surface and dry completely, as mold spores thrive in wet environments. It is also a good idea to wash your clothes and shoes after working in an area with mold, as they will likely carry the spores in and out of the house.

Cleaning the Air

Mold spores are everywhere in our homes and are constantly dispersed in the air. When we breathe in these spores, our lungs can absorb them, which causes allergies and other respiratory issues. For this reason, it’s important to remove all sources of mold spores from the environment, including those that have not yet grown into visible colonies.

Mold removal starts with identifying and removing the source of moisture that has allowed the mold to grow. Once that is done, the affected area can be cleaned and sanitized. When cleaning a moldy surface, it is important to use only non-toxic cleaners as some types of mold are toxic to humans. Non-toxic cleaners typically consist of white vinegar and water in a spray bottle or bucket. This mixture is sprayed or applied directly onto the moldy surface and scrubbed vigorously using a brush with a long handle. The contaminated surfaces should then be rinsed with clean water and thoroughly dried to prevent further mold growth.

Porous materials, such as drywall and ceiling tiles, should be discarded if they cannot be fully cleaned and disinfected. For these surfaces, it is essential to wear a mask, rubber gloves and goggles during the clean-up process to protect yourself from mold spores that may become airborne.

It is also a good idea to test an area of suspected mold to ensure it is actually mold and not mildew. This can be done by dipping a cotton swab in diluted bleach and swiping the area. If the spot lightens after a minute or two, it is likely that you are dealing with some form of mold and not mildew.

If you are concerned that your house has a problem with mold, you should consult an expert for a professional assessment and evaluation of the damage. If the extent of the mold is severe, it is best to call in a professional to avoid any further damage and to ensure the safety and health of your family and pets. Exposure to some types of mold, such as cladosporium and stachybotrys chartarum, can cause allergy symptoms like sneezing, coughing and shortness of breath in humans and can result in serious lung diseases in animals.

Final Inspection

Mold is a type of fungus that thrives in damp areas. It can be found in many places, including outside on grass clippings or on food in a refrigerator (such as green cheese). But it isn’t always harmless and may cause health problems, especially for those with certain allergies or compromised immune systems. There are even a few types of mold that are toxic. One such example is Stachybotrys chartarum, commonly called “toxic black mold.” Mold spores can trigger allergy and respiratory reactions. They can also irritate skin, trigger headaches, and cause memory loss and concentration problems.

The most important step in any mold remediation process is removing the mold and addressing the moisture problem that caused it to grow. If the underlying issue is not fixed, the mold will likely return and could continue to grow and destroy other surfaces.

Once the mold and spores are gone, a professional inspector will conduct a final inspection of the affected area. He or she will test the air to ensure the humidity level is back to normal. The professional will also check to see if the walls and floors are dry. If they are still wet, the professional will use dryers and fans to speed up the drying process.

Any contaminated items will be bagged, sealed, and disposed of in accordance with EPA standards. The inspector will then sanitize all surfaces with a bleach solution. He or she will wipe down the surfaces with a sanitizing brush and then sanitize the tools used to clean the surface with a disinfectant. This is a vital step, as touching or jostling the moldy surface can release more spores into the air and make the situation worse.

Once the surface is clean, construction services can begin to rebuild the area. Occupants should be informed of the mold problem and any construction that will take place in the space. Upon request, they should be given a copy of any inspection or testing reports. Once the space has been cleared for reconstruction, the mold restoration company can issue a certificate of clearance.

What Is Plumbing and Why Is It Necessary?

Plumbing is the system of pipes and fixtures introduced into a building for the distribution and use of potable water and the removal of wastes. It is differentiated from process piping which conveys chemicals, gases, and other industrial fluids.

Plumbing

Plumbers are specialized professionals who install, repair and maintain these systems. Their work ensures safe and clean drinking water and proper drainage in commercial and residential settings. Contact St Pete Plumbing for professional help.

Plumbing systems are complex and integral to the safety and functionality of buildings. They ensure that clean, potable water is readily available for domestic and commercial use, and that waste is efficiently removed from the premises. Plumbers install and maintain these vital pipes and fixtures, working on projects that range from home remodels to large-scale building construction. Their work requires attention to detail and a thorough understanding of local building codes and regulations.

When installing new plumbing, plumbers begin with the rough-in phase, which involves laying pipes underground before the foundation is poured. This step is important to prevent damage to the pipes and to ensure that the finished plumbing system will operate properly. Plumbers also connect the internal plumbing network to external water and sewer systems, which is an essential part of ensuring safe, clean drinking water.

Once the frame of the building is up, plumbers can start to install fixtures like sinks, toilets, showers, and faucets. These are the elements that we interact with daily, so it’s important that they’re designed and installed for optimum performance. This includes considering things like the amount of water flow, temperature control, and energy efficiency. For example, a plumber might recommend replacing an old water heater with a tankless model that saves money and energy by heating water only when it’s needed.

Another key component of a plumbing system is the venting system, which protects against dangerous gases like carbon monoxide. It consists of pipes that connect to the drainpipes and extend to the outside of the building, where they open to allow air to enter and escape the system. The plumbing code requires that these vents be inspected and tested regularly to prevent dangerous build-up.

When a building’s construction is complete, plumbers test the entire system to ensure that it works as intended. This involves checking for leaks, examining the rough-in work, and testing the water pressure. If any issues are found, the plumber can make repairs to bring the plumbing up to standard.

Repair

Plumbing repair can involve fixing or replacing fixtures, appliances and pipes. The goal of plumbing repair is to restore the function of the fixture or pipe while maintaining the aesthetics of the home. Common repairs include leaks, clogs and water pressure issues. Plumbing professionals have the tools and training to address most issues, but sometimes a more involved fix may be required.

Leaks are a big problem in many homes and can lead to expensive damages. Plumbers can repair small leaks and install hoses, valves and fittings to prevent future damage. For more extensive repairs, plumbers can replace damaged sections of pipe and repair or replace leaking joints. They can also upgrade aging plumbing systems by installing new, energy-efficient appliances and fixtures.

When repairing a leak, it is important to turn off the water supply to that area of the house before starting work. Then, the plumber can dry out and inspect the area for hidden damage. After the repair is complete, the plumber can turn the water back on and test the area for additional leaks or problems.

Most people use some type of water filtration in their home to remove sediment, chemicals and other contaminants. Plumbers can install and repair water filters as well as address issues with water chemistry like pH imbalances that can cause health concerns.

The most common plumbing repair involves toilets and faucets. Most homeowners are able to repair simple leaks in faucets and toilets, but when the issue is more complicated or involves a part that is difficult to find or replace, it’s best to leave the repairs to a professional.

While regular maintenance can extend the lifespan of most plumbing components, some signs may indicate that it’s time for a replacement. Frequent or recurring leaks, clogs and low water pressure are all indications that it’s time to call a plumber. A professional can help you decide whether to repair or replace your plumbing and suggest the most cost-effective option for your home. They can also provide advice on energy-efficient upgrades that can save you money in the long run.

Maintenance

The plumbing system in any building is a crucial component that provides the water needed for everyday functions. The pipes, valves, and fixtures that make up the plumbing network need regular attention to ensure they are in good condition.

The best way to prevent costly repair costs and other issues is through consistent plumbing maintenance. The process involves methodically inspecting and servicing all the components of the plumbing system, such as checking water shutoff valves, examining supply lines beneath sinks, flushing drain lines, and more. During this time, technicians look for signs of leaks, corrosion, rusting, and other potential problems that could lead to expensive repairs down the road.

Routine plumbing maintenance also reduces the likelihood of emergency breakdowns, which can be disruptive and stressful. It also helps keep your water quality high and prevents backflow incidents that can contaminate the water supply.

Many people don’t think about their plumbing until a problem occurs, but it’s important to perform routine checks on the system. The most common issues are leaks, which can quickly lead to water damage and mold growth. Other issues include clogged toilets and drains, which can cause unpleasant odors and increase the risk of overflow.

Plumbing maintenance also enables you to catch small problems, such as a worn washer or loose pipe connection, before they become major repairs. This can save you money in the long run, as it is much more cost-effective to fix a minor issue than to deal with water damage or expensive pipe replacements later.

Performing regular maintenance on your plumbing system can also help you comply with local codes and regulations. For example, if you have an old septic tank or sewer line, keeping them maintained can improve the efficiency of your plumbing system and protect you from code violations.

A well-maintained plumbing system can enhance the value of your home or business. It can also provide a safer and healthier living environment for you and your family. Leaking pipes can lead to mold and mildew, which can contaminate your water supply. In addition, rusting and sediment build-up can affect the quality of your water. Moreover, regularly maintaining your plumbing can improve the lifespan of household appliances like dishwashers and washing machines by ensuring they get clean, debris-free water.

Replacement

When repair costs become too high or if a fixture is too outdated, it may be time to replace it. Newer, more efficient fixtures can save money in the long run. A qualified plumber can help determine if replacing existing plumbing fixtures is worth the investment.

The system of pipes and fixtures introduced in a building for the distribution of potable water and the removal of waste water. It is usually distinguished from the water and sewage systems that serve a group of buildings or a city.

Plumbing fixtures include everything from faucets and sinks to toilets, showerheads and bidets. These are essential for getting water into and out of your home or business, but they also wear down over time. Knowing when it’s time to replace a fixture can reduce the risk of leaks, contamination and expensive repairs down the road. Experiencing consistent problems or noticing discolored water is often the first sign that it’s time for a replacement.

What Does a Plumber Do?

Plumbers ensure we can enjoy a hot shower or bath after a long day at work. They also safeguard our health by maintaining a clean water supply and preventing sewer backups. Contact Jamaica Works LLC now!

Plumbers need good customer service skills to deal with complaints and solve problems. They also need to be able to follow directions and understand blueprints. The job requires physical strength, stamina, and dexterity.

Plumbers install and repair systems that transport water, waste, gases, and hot liquids. Their job duties include inspecting existing plumbing, testing pressure levels, locating leaks and blockages, fitting replacement parts, and installing fixtures such as toilets, taps, and sinks. In addition, they must be familiar with building codes and regulations to ensure plumbing installations are compliant. They often work with customers, so customer service skills are important as well.

To become a plumber, you need to complete an apprenticeship and earn a license. Typical programs last four to five years and combine classroom study with on-the-job training. Some trade schools also offer vocational programs that can lead to a career as a plumber. In either case, a high school diploma or equivalent is required before you can begin your apprenticeship.

During the installation process, a plumber measures the space to determine the size of pipes and related fixtures needed. Then, they lay out and cut the pipe and attach any necessary fittings. Before starting on new construction, they check the blueprints and other plans to make sure all plumbing is coordinated properly with the structural components of the building. Finally, they test the system to ensure it is working properly.

When a Plumber is called out to an emergency job, they must be able to assess the situation quickly and take appropriate action. This may involve repairing or replacing damaged pipes and fixtures, or it could be as simple as unclogging a drain. They should also be able to communicate with the client about their needs and provide an accurate estimate before starting any work.

Plumbing experts must have a solid understanding of hydraulic systems to troubleshoot problems and maintain functional plumbing. They are patient individuals with a practical mind and manual dexterity, allowing them to work efficiently on a variety of projects. Whether laying pipes or repairing broken drains, they must always keep safety in mind and wear the proper gear to avoid injury.

Repair

Plumbers repair plumbing systems to ensure they are functioning as effectively as possible. This can involve fixing leaks, repairing broken fixtures, fitting replacement parts like taps or valves and even power flushing central heating systems. Often, this type of work requires the use of specialized tools and equipment. Plumbers also advise customers on best practices for maintaining their plumbing, such as how to avoid clogs and how to reduce the risk of pipe damage.

A skilled plumber will be able to identify the source of a problem quickly, and will know how to fix it in a way that is efficient and effective. This means they will be able to save you both time and money in the long run. For example, if you have a leaky water pipe, they might suggest a simple stop-gap measure such as applying 1-4 wraps of plumbers tape around the threading where metal pipes connect. This will create a tight seal and prevent further water loss. However, if the problem is more serious, they might suggest cutting out the damaged section of pipe and replacing it with a new piece.

While many plumbing problems have at-home solutions, it’s always a good idea to get a professional plumber in to do the job. This is because attempting DIY plumbing repairs can lead to more costly and serious issues down the road. For example, if you attempt to clear a clogged drain with a snake and break your main sewer line in the process, the lifespan of your entire system will be significantly reduced.

It’s also important to note that not all plumbers are trained to deal with every type of plumbing problem. Some have specialized in particular areas, such as repairing hot water heaters or dealing with septic tanks. It’s also worth mentioning that commercial plumbers are generally experienced with dealing with bigger plumbing issues like re-piping or large scale drainage systems for multi-level buildings.

Maintenance

As with any system that gets used on a daily basis, wear and tear naturally occurs, and this can lead to problems like clogged drains, water leaks and even overheated water heaters. Performing routine plumbing maintenance can help prevent these issues and keep your home running smoothly.

Plumbers often conduct regular inspections to identify and address potential issues before they become more serious. These can include assessing water pressure, checking for leaks and other damage to pipes, and ensuring all fixtures are functioning properly. Regular plumbing maintenance can also help you save on energy bills. Leaking toilets, for example, can waste up to 30 gallons of water per day, and installing a new flapper or fill valve can help reduce your water consumption.

Many plumbing problems arise from poorly maintained systems, which is why plumbers recommend scheduling a plumbing checkup at least once a year. This can help you catch and repair small problems before they cause major issues like burst pipes or backup sewage.

In addition to examining all plumbing fixtures, a plumber can also assess your water usage and recommend ways to improve efficiency. For instance, a plumber may suggest installing a water softener to reduce mineral buildup in your pipes and fixtures, which can help increase the lifespan of your home’s plumbing system and lower your utility bills.

Keeping your home’s plumbing in tip-top shape can help ensure the safety of your family and protect your investment. If you notice any signs of trouble, such as a persistently leaky faucet or dripping shower head, contact a local Staten Island plumber right away to schedule an appointment.

A high school diploma or GED certificate is the minimum educational requirement to become a maintenance plumber. However, most plumbers acquire their skills through a four or five-year apprenticeship program with a general plumbing firm. Some colleges and vocational schools also offer post-secondary certificate programs in plumbing. A maintenance plumber’s responsibilities are to assemble, install and repair pipe sections, tubing, fittings, passage holes and appliances in residential and commercial facilities according to code specifications. They also perform diagnostic testing to identify and resolve malfunctions in heating, air conditioning, lubricating and steam piping systems that carry water, chemicals, and fuel.

Inspection

A plumbing inspection is a visual examination of your home’s water and drain pipes, fixtures and appliances. Licensed plumbers check for signs of corrosion, leaks and overall poor condition that may lead to costly repairs. Plumbers use a variety of tools and techniques to inspect your plumbing system, including electronic leak detection equipment and cameras. They also walk through your house checking for things like caulking, water valve operation and other details. You can help make the process go more smoothly by making sure the plumber has access to all areas of your house, being especially careful to clean out areas below sinks.

The scope of a plumbing inspection can vary, but most plumbers will check for:

Leaks – Plumbers look for drips, puddles and water damage around fixtures, under sinks and in the basement. They will also run water through fixtures to check for adequate drainage and venting. Inspectors will also look for rust, mineral buildup and other issues that can reduce your plumbing’s lifespan.

Water Lines – Plumbers check for corroded or leaky water lines, if the water is discolored or if there are signs of corrosion on fixtures and water appliances. Inspectors will also assess the water pressure and test the water heater for proper functioning and safety.

Fixtures – During the inspection, your plumber will look at the condition of all your fixtures and faucets, including toilets, showerheads, sinks and bathtubs. They will examine them for leaks, water stains, general wear and tear and other problems. Plumbers will also evaluate your dishwasher and washing machine for proper functionality and efficiency.

Drainage – During an inspection, your plumber will look for clogged drains and gurgling noises that may indicate obstructions or insufficient draining. Inspectors will also look at your home’s sewer line for clogs, improper slope and other concerns.

After completing the inspection, your plumber will provide you with a comprehensive report of their findings. This will include a summary of any potential problems, their location within the plumbing system and recommended repairs. They will also offer advice on preventative maintenance to keep your plumbing system in good condition between inspections.

How Much Does Stump Grinding Cost?

Stumps can be unsightly and detract from the beauty of your property. They can also cause trip hazards and block access to your yard and driveway. Stump grinding converts them into wood chips that can be used as mulch or replanted, promoting soil health and moisture retention.

It also eliminates trip hazards and prevents regrowth. Moreover, it reduces the risk of fungal disease infecting other plants and trees. Contact Stump Grinding Phoenix now!

Several factors can affect the cost of stump grinding. These include the size of the stump, the location of the stump, and the condition of the soil. The price of a stump grinding also depends on whether the company provides mulch as part of its service. Some companies offer this service, while others do not. It is important to note that the mulch must be removed from the site after the job is completed, which adds to the overall cost of the service.

Besides being an eyesore, a tree stump can be a home for termites and other wood-boring insects. Stumps can also block the flow of water and nutrients to surrounding plants, inhibiting their growth. Stump grinding removes these obstacles and allows the grass to thrive, improving the aesthetic of your property. Moreover, removing the root system through stump grinding helps to prevent erosion and protects nearby plants from insect infestation.

The stump grinding process also creates wood mulch, which can be beneficial to the environment. Some people use it for their landscaping or gardens, while others leave it in the hole to save money on buying bagged mulch from home and garden stores. Regardless of the use, this debris can help to improve the soil quality by reducing compaction and enhancing its structure and texture.

It is important to choose an experienced company that specializes in stump grinding. This will ensure that the process is done correctly and efficiently, which will reduce the likelihood of regrowth. Also, a professional will have the right equipment and knowledge to handle the task. In addition, they can make recommendations to prevent future problems.

A professional will also know the zoning regulations and safety hazards that may be associated with the project. Moreover, they will understand the complexities involved in removing the stump and its roots. Consequently, they will be able to provide you with a more accurate estimate and complete the job on time.

The cost of a stump grinding job can be greatly reduced by choosing a company that offers discounts on multiple services, like tree trimming and stump removal. Additionally, many tree care companies use software to streamline their business operations, including scheduling, dispatching, reporting, and invoicing. These features will reduce the cost of the job and improve efficiency, which is especially helpful for businesses that deal with a large volume of jobs.

Safety

Stump grinding is a hazardous operation that requires the use of personal protective equipment. It is essential that the operator know how to operate the machine properly and understand the risks involved. Proper training can help reduce the risk of injury and property damage. Training programs should include simulated emergency scenarios to prepare operators for real-life situations.

Before starting the stump grinding process, an inspection should be done to ensure that the ground is safe for the stump grinder and the operator. The ground should be free of rocks, twigs, and other debris that can cause accidents. Also, it is important to check if there are any underground utilities in the area. These could include water & gas lines, sprinkler lines, or metal fencing that can be damaged by the stump grinder.

In addition to safety, a stump grinding job can have a positive impact on the environment. It can promote new plant growth and encourage biodiversity. It can also be used as mulch, which is a good way to reduce the amount of waste and help with soil erosion. Besides, it can also help you save money by eliminating the need to buy expensive landscaping materials.

Stump removal is an excellent way to improve your yard and the overall look of your home. In addition to adding beauty to the landscape, it can also increase the value of your property. But it is important to note that you should hire a professional to complete the job. An experienced contractor will have the right equipment and knowledge to make your property look its best.

It is best to hire a company that has experience in the industry and offers affordable prices. In addition, the company should be licensed and insured. This will give you peace of mind that they will take care of the job correctly and safely.

Stumps left in the ground provide a perfect habitat for insects and pests. They can be a food source for termites, carpenter ants, and wood-boring bees, which may eventually infest healthy trees or even your house. By removing the stumps, you can eliminate these pests and prevent them from infesting your home.

Time

Stump grinding is an effective way to get rid of unsightly tree stumps. However, it is not a quick process and can take hours to grind out a stump. This is especially true if you are dealing with an old, stubborn stump or one with extensive lateral roots. In addition, the ground must settle after stump grinding and may require some leveling, which can add to the overall time of the job.

Getting rid of an unwanted tree stump can improve your property’s aesthetics and increase its value. Unsightly stumps can be a turn-off for potential buyers or tenants and can reduce the appeal of your landscape. Fortunately, you can minimize the time and effort required to get rid of unsightly stumps by hiring a professional to grind them for you.

When you hire a stump grinding service, the company will first grind the top portion of the stump and then cut down the remaining root system. This process can take a few hours to complete, depending on the size and species of the stump and the complexity of its root system.

The resulting mulch or wood chips can be used in your garden beds to promote soil health and moisture retention. They can also be replanted to form new trees or shrubs, which can help with reforestation efforts. This eco-friendly alternative to chemical stump removal is less disruptive to the environment and can significantly reduce your ecological footprint.

Stumps that are left to rot can become a breeding ground for pests, including termites, carpenter ants, and beetles. These insects can infest healthy trees and even your home, so it is important to remove them before they spread. Stump grinding is the most effective method for removing unwanted rotting stumps and their invasive root systems.

Unlike traditional stump removal, which uses toxic chemicals, a stump grinder removes the entire tree stump and its roots without causing any damage to the surrounding area. This method is also less disruptive to the local ecosystem, as it doesn’t leave a gaping hole in your yard and won’t disturb the soil or water supply.

Environmental impact

Stump grinding involves using a powerful machine that cuts down stumps to just below the surface of the soil. This process can be dangerous for homeowners and should only be performed by professionals. It’s important to wear protective equipment and safety glasses, clear the area around the stump before starting the machine, and follow all operating instructions. Stump grinding can also cause damage to surrounding trees and shrubs, so it’s important to protect them from injury or damage.

Moreover, the process of stump grinding can also create a lot of debris that needs to be removed and hauled away. This can be expensive, but it’s necessary to ensure the health of your landscape. Stump grinding companies typically charge a flat fee based on the diameter of the stump. This can range from $50 to $200, depending on the size of the stump.

In addition to removing the underlying structure of the tree, a professional stump grinder will grind the root mass down to the ground level, creating wood chips that can be used for landscaping. This can be a great option for people who want to plant new flowers, shrubs, or lawns without having to worry about the old roots taking up valuable space. Alternatively, you can fill the holes with dirt and pack it down to prevent erosion and other environmental issues.

Stumps that have a twisted trunk or multiple trunks can be more difficult to grind than those with a straight, single-trunked base. This can also be the case for trees with wide-reaching roots, such as willows, sycamores, or cottonwoods. Moreover, stumps in tight spaces or those located near fences or buildings will require more planning and maneuvering to operate the grinding machine. This increased complexity will increase the overall service price.

Lastly, the noise generated by the stump grinders can disturb wildlife and residents of nearby areas. It’s important to choose a company that prioritizes environmental sustainability and takes steps to minimize the negative impact of its operations. For example, they may use electric-powered stump grinders to reduce pollution and noise emissions. They might also recycle the wood chips from their grinding operations and use them as mulch.

How to Identify Problems That Can Be Fixed With a Roof Repair

There are many things that can damage a roof. It is important to regularly inspect it.

Roof Repair

It is also a good idea to check and repair the flashing around chimneys and roof windows. This is a weak spot that can allow water into the home. Contact Corpus Christi Roofing CO for professional help.

Although some repairs are within the capabilities of a handy homeowner, most should be left to the professionals. This is to avoid voiding any warranties and protect the structural integrity of your home.

The roof is an integral part of the home that protects everything inside and adds value to it. Unfortunately, it’s not infallible and requires regular maintenance to prevent issues from getting out of hand. If you want to avoid costly replacement, you need to know how to identify problems that can be fixed with a simple roof repair.

Damaged shingles and tiles are the most common roofing issue. High winds, falling debris, and aging can all loosen or damage shingles and tiles. This can lead to a variety of problems, including leaks, rot in wooden substructures, and mildew and mold growth.

Fortunately, you can prevent most roof issues by regularly inspecting the structure and looking for signs of trouble. A good place to start is with a visual inspection of the shingles and gutters, especially after a storm. Look for curled, missing, or cracked shingles, and examine the flashing around chimneys, skylights, dormers, and vents.

If you have a vaulted ceiling, it’s essential to check the attic at specific intervals for discoloration and water stains. If there are any issues, it’s best to call a professional for a quick inspection and repair.

Leaks can be tricky to detect, as they may manifest at spots distant from the source of the problem. You can try spraying down a ceiling with a hose, but it’s much easier to find the source of the leak by checking for flow stains on the plastic vapor barrier under the drywall.

A professional can also inspect the roof for any shingle and flashing issues that need to be repaired. These can include cracking, blistering, buckling, cupping, or splitting. If these are left unattended, they can lead to moisture penetration, which can cause serious damage.

A roof repair company will also check for clogged gutters, which can lead to problems with siding and foundations. They’ll also assess the presence of moss and other organisms, which can cause leaks, rot, and general structural damage. These organisms thrive in dark and damp areas, and if they get out of control, they can cause serious problems with the wood in your roof’s substructure.

Remove the Old Shingles

If your roof is leaking or showing signs of wear and tear, you need to get it replaced as soon as possible. This is a difficult project to complete on your own, so it’s best to hire professionals to do the job right.

You’ll need to remove all of the old shingles from the roof before you can begin the repairs. Make sure that you have a dumpster and a large tarp nearby to hold all of the debris. It’s also a good idea to have someone on the ground to keep an eye out for falling shingle pieces.

Start by removing the shingles near the roof jacks on the section of the roof you’re working on. Then, work your way down the rest of the roof, removing the shingles and felt paper as you go. You’ll want to work carefully to prevent the shingles from sliding down the roof and tearing up your gutters or causing other damage.

Once you’ve removed the shingles, sweep the area to remove any remaining nails and debris. You may want to cover the bare roof with a self-sticking water and ice barrier to prevent it from getting wet while you’re working on the repairs.

It’s a good idea to have a garden fork on hand as you’re removing the shingles. This tool is specially designed to help you remove shingles easily, with a serrated edge that grabs under the nails and a raised “foot” on the back to add leverage. Using this tool will allow you to remove the shingles without damaging the sheathing beneath them.

Carefully inspect the flashing (the thin strips of metal that direct rainwater away from the house) as you work to determine if it can be reused or if it needs to be replaced. It’s best to replace the flashing as you’re removing the shingles, to ensure that the new shingles will create a water-tight seal with the sheathing underneath.

Inspect the Flashings

The flashings are strips of metal or rubber that create a waterproof barrier at areas where the roof changes planes or penetrations occur, like chimneys, vents and skylights. While roof leaks can also be caused by shingles, vent cracks or poorly sealed valleys, the majority of them begin at the points where different pieces of the roof intersect. For this reason, it is important to regularly check and repair your roof flashings.

A professional roofer will inspect the condition of your roof for signs of leaks, rot and other problems. They will also look at the flashings for issues such as cracking or rust. Since they are a critical component of your roof system, they should be maintained properly to protect the interior of your home from moisture.

Leaks often start in the flashing, so it is especially important to keep an eye on them. If the flashing is leaking or shows signs of damage, it must be repaired immediately.

A common cause of flashing leaks is poor installation. This can be a problem with the flashing itself or the sealant used to secure it.

It is a good idea to hire a professional for this job as it is dangerous to climb on the roof without the proper safety equipment. If you are confident in your own abilities, though, you can inspect the flashings by following the steps below.

First, check the shingle seams for any gaps or overlapping. If there are any, these will need to be caulked. This will prevent water from seeping in between the shingles and into the attic or living space.

Another common issue is the failure of the flashing to adhere to the wall or roof. This is usually caused by the flashing being too narrow for the vent or other item it is covering. It is a good idea to have a professional roofing contractor inspect the flashings on all safely accessible projections from your roof, like chimneys, vents and skylights.

A simple test to identify a leak in the flashing is to run a hose over your roof. If the person in the attic can hear water dripping, it is likely the flashing is leaking or not fastened properly.

Clean the Area

As you clean the roof, be sure to inspect the area around your gutters and downspouts. They should be free of debris and in good working condition so they can effectively direct rainwater away from your roof and home. If the gutter system is not functioning correctly, it can result in leaks and other problems down the road.

Also, be sure to examine the flashings around chimneys, skylights and any other roof projections that are located on your home. These areas are vulnerable to water infiltration, especially when the flashing has become corroded. Regular inspection of these areas can prevent them from becoming a major problem.

While you are on the ladder, take a moment to clean the fascia and soffit with a brush and bleach mixture. This will help to keep them in good shape and will also make the entire house look better. Be sure to check for any spots of mould that may have developed on the fascia and soffit over time. If you find any, then it is a sign that the roof is leaking and should be repaired by a professional.

Why Septic Tank Cleaning Is Necessary

Septic tank cleaning is necessary for a well-functioning home plumbing system. It’s also important for protecting the environment and your family’s health.

When a septic system isn’t properly maintained, waste can leak into the soil and water supply, leading to health problems. To prevent this, it’s best to keep a regular maintenance schedule. Click the Website to learn more.

Septic tanks are put in place for homes that aren’t connected to the local sewer system. These tanks are designed to store wastewater until it can be disbursed into the drain field or leach field. During this process, the waste is separated based on its density and buoyancy. Solids rest at the bottom of the tank (sludge), water settles in the middle, and fats and oils float to the top (scum). Bacteria breaks down these solids and liquids, then they are dispersed into the drain field through an outlet. The septic tank should be regularly cleaned and inspected to ensure it is working properly. If left untreated, a septic tank that is full will cause sewage backups throughout the home and surrounding yard, which can pose serious health risks.

The most obvious sign that your septic tank is overflowing is standing water in your yard or around the drainfield. This is an indication that the septic tank is overflowing and can’t hold any more waste. If you’re seeing this problem, it’s important to contact a septic tank cleaning professional immediately.

Another common sign that your septic tank needs cleaning is slow-draining toilets and sinks. If your bathroom, kitchen and laundry drains are taking a long time to empty, it may be because the septic tank is too full and can’t handle any more waste. This will cause wastewater to back up through your home’s plumbing, which can lead to serious damage and odor.

Finally, if your toilets are making gurgling noises while flushing, this can be an indicator that the septic tank is overflowing. This can lead to dangerous sewage backups inside your home, which may require costly repairs.

A strong odor of sewage or sulfur can be an indication that your septic tank is dirty and in need of cleaning. This odor is caused when bacteria in the tank breaks down organic matter. This can be very hazardous to your family’s health, so if you notice this problem, call a septic tank cleaning company immediately.

Another important sign that your septic tank is in need of cleaning is if it’s been more than three or five years since the last cleaning. While the frequency of septic tank cleanings depends on the size of your household and the amount of waste it produces, every tank should be inspected and cleaned at least once every three to five years. Failure to do so can result in costly repairs and a dirty, unhealthy home environment. If you’re unsure of how often your septic tank should be cleaned, talk to an expert. They’ll be able to give you an estimate based on the size of your home and how much waste it generates. From there, they can schedule an appointment to clean and inspect your septic tank.

Septic Tank Inspection

Most homeowners don’t give their septic system much thought until something goes wrong, such as sewage seeping back into the house. Regular septic tank cleanings and inspections help prevent these kinds of situations by ensuring that the septic system is working correctly. A septic tank inspector will check all parts of the septic system to make sure everything is in good condition and functioning properly.

In most cases, a septic tank inspection can be completed in just two to four hours. However, the time frame may vary depending on how complex or extensive the septic tank and drain field are, the property size, weather conditions and regulatory requirements in your area.

During the inspection, your septic tank technician will probe the tank to determine its level and ensure that water is flowing into it as it should. The inspector will also look at the scum and sludge layers to confirm that they’re not too high and blocking water flow. The inspector will also inspect the drain field and ensure that it’s far enough from wells and streams to protect groundwater and surface water.

A full septic tank inspection is a more thorough process, as the inspector will open up the cover to the septic tank and visually examine its contents. In addition to checking the liquid and sludge levels, the inspector will verify that all vent pipes are clear and intact, and that the septic tank’s baffles are in good condition.

The inspector will also use a device called a “sludge judge” to measure the amount of sludge in the septic tank. Ideally, the sludge should not exceed a certain depth inside the tank to avoid overflowing and damaging the drain field and leach lines.

Septic tanks and their associated drainage fields play a vital role in safely managing wastewater from toilets, showers, sinks, washing machines and dishwashers. The septic system collects wastewater, filters it and sends it out to the drain field for final disposal into the soil. A poorly-maintained septic tank can cause a number of problems for the entire household. For example, if the septic tank is overfilled, the home’s drains may begin to slow down or even stop working altogether. In addition, a cracked tank can lead to the leaking of dangerous liquids into the home and surrounding property.

Septic tank inspections and cleanings can be performed by a certified septic system professional or you can do it yourself. However, it’s important to remember that the process is a messy one and requires specialized equipment and expertise. If you decide to do the work yourself, be sure to follow all local regulations and use proper safety precautions. In addition, most septic tanks have thick concrete lids that are not easily opened, and are known in the industry as “coffin lids.” Trying to open these lids can be dangerous, so if your septic tank is overdue for an inspection, contact a licensed professional instead.

Septic Tank Pumping

In most cases, the most obvious sign that a septic tank needs to be cleaned is when sewage backs up into your home. This is a clear indication that your septic system has become too full and can no longer handle the waste it receives from your house. In the worst case scenario, if you don’t have your septic system properly maintained and pumped, it could begin to leak septic fluid into the ground. This can contaminate local water sources with bacteria, viruses and other pathogens.

Fortunately, it’s easy to avoid this problem with regular maintenance and pumping of your septic system. A professional will first complete a thorough inspection of your septic tank. They will check the inlet and outlet pipes for clogs, cracks or other signs of damage and ensure that baffles are installed and in good condition.

Next, the septic tank will be pumped using a large truck with special equipment. A hose is inserted into the manhole and a vacuum is created to remove all of the liquid and solid waste from the septic tank. This process can take several hours, so it’s important to schedule cleanings and inspections at least every three years.

Once the septic tank has been pumped, the technician will clean and flush the drain field lines. This includes checking for and removing any filters that have collected lint, coffee grounds or other items that can’t be broken down by the septic system’s natural bacteria.

A properly functioning septic system is the end of the line for all your household’s waste, so it’s essential to maintain it regularly and avoid allowing too much sludge to build up in the tank or leach fields. This will prevent the septic system from operating as it should, resulting in slow drainage, sewage backups and other unpleasant side effects.

If you suspect that your septic tank may be filling up too quickly, don’t wait until the last minute to call for a professional inspection and cleaning. In addition to being dangerous to your health, a full septic tank will also lead to expensive and time-consuming repairs.

In the meantime, make sure to be cautious around any open or exposed septic tanks and never climb into one. A fall into a septic tank can be fatal. Also, never park a vehicle over the tank or drain field. The weight of a vehicle on the tank and its contents can cause it to rupture or collapse. Septic tank cleaning services are a must for every homeowner with a septic system. Call Pete’s Outflow Technicians for a fast, efficient and affordable septic tank cleaning and inspection in your area. We serve clients across the nation. Visit our Website today to get started.

Dental Implants Explained by Your Implant Dentist

Implant Dentist Las Vegas are a long-term commitment to your oral and overall health. During the treatment planning phase, we will review your medical history and take X-rays to determine the status of your bone.

Dental Implants

If your jaw has a minimal amount of bone, we can perform a small graft to add more bone to the area. After this heals, we can place your implant post and abutment.

Dental implants are a permanent replacement for missing teeth. They offer the closest thing to natural tooth structure available in modern dentistry, and can restore a patient’s smile without affecting neighboring teeth. Implants are also the only restoration option that maintains and stimulates bone growth, keeping jawbones from shrinking. The treatment is safe when performed by a qualified and experienced surgeon or dentist.

People who have lost teeth due to gum disease, injury or as the result of a medical condition may qualify for dental implants. They can be used to replace single teeth, multiple teeth or even all of the upper and lower teeth in a jaw.

Before starting the implant process, your dentist will do a full exam of your mouth including X-rays and 3D images of your teeth and jawbones. This will help them determine if the amount of healthy bone remains to support an implant, which is vital. If there is not enough healthy bone, a special bone graft can be done to build up the area and create a strong foundation for the restoration.

The next step involves surgery to place the implant. During the procedure, your oral surgeon will make a cut to open the gum and drill holes into the bone where the titanium implant metal post (the equivalent of a tooth’s root) will be placed. The site is covered by a healing cap and given time to heal.

The implant will fuse to the bone, a process known as osseointegration. Once the healing is complete, a temporary abutment can be attached to the implant so that your dentist can create a crown. Once the new crown is attached to the abutment, it will be hard to tell the difference between your natural teeth and your implant.

How Does a Dental Implant Work?

Dental implants are titanium posts which act like artificial tooth roots to hold and support fixed (permanent) or removable replacement teeth that look, feel, and function like natural teeth. They can replace single or multiple missing teeth without affecting surrounding teeth or gums. The implant process takes several months and can be complicated, but it’s worth the wait for a permanent solution to missing or damaged teeth.

To prepare for the surgery, your dentist will take a medical history and give you a comprehensive dental exam. They will also do a panoramic x-ray and 3D CT scan of your mouth. This helps them determine if you have sufficient jawbone to support an implant and if there are any other issues that need to be addressed.

During the implant procedure, your oral surgeon will make an incision in your gum to expose the bone and then use a series of drills to create and enlarge a site (called an osteotomy) for the implant metal post. They will then place the implant. If necessary, they will perform a bone graft before placing the implant to add more bone to deficient areas.

Once the implant is in place, your gums will be sutured and allowed to heal. During the healing process, your implant will fuse with the jawbone in a process called osseointegration. It is a critical step in ensuring the longevity of your implant and avoiding potential problems.

Once the implant is fully healed, your dentist will place a connector on the implant called an abutment. They will then attach an artificial tooth on top of the abutment for a natural-looking result. It is essential to maintain a healthy oral environment after the surgery, which includes regular brushing and flossing as well as professional cleanings.

What Are the Advantages of a Dental Implant?

Dental implants are a great way to replace missing teeth. They are strong and durable, and with good oral hygiene, they can last a lifetime. They also look and function like your natural teeth. They can improve your appearance by filling in empty spaces and preventing the facial sagging that occurs when teeth are missing for an extended period of time.

They help to maintain bone density by mimicking the root structure of your natural teeth. The implant post anchors into the jawbone and stimulates it, reducing bone loss in the area of the missing tooth.

In addition, they can prevent nearby teeth from shifting out of place, a condition called TMJ (temporomandibular joint) syndrome. They can also improve your ability to chew and eat foods properly, which can help with digestion. Lastly, they can restore your speech clarity by filling in gaps caused by missing teeth.

One disadvantage of dental implants is that they may interfere with your sinuses, which are air-filled cavities located above the jawbone. If the implant posts are placed in the upper jaw, they can cause inflammation and congestion of the sinuses, known as sinusitis. The condition usually resolves on its own once the implant heals, but in some cases, you might need treatment from a doctor or ear, nose, and throat specialist.

Another downside of dental implants is that they require significant financial investment and a commitment to meticulous at-home care. They are not a good fit for people who smoke, and they can aggravate existing oral health problems. If you are interested in dental implants, it is important to see an implant dentist for a consultation and discuss your options.

How Much Does a Dental Implant Cost?

As with most dental procedures, the cost of a dental implant can vary from person to person. Factors that affect cost include the location of your dental practice, the expertise of the dentist and the type of materials used for the implant body and abutment. Generally, titanium is the most affordable material for implants, although zirconia implants are also available for a slightly higher price. The number of implants required will also affect the cost.

In addition, certain preparation procedures can increase the initial investment. For example, if you need to have a bone graft done before the implant procedure, this will add to the overall cost of the treatment. And if you require additional work, like having your gum line reshaped to make room for the artificial tooth, this will also increase the total cost of the implant.

Another factor that will influence the cost is whether or not your dental insurance covers the procedure. Most dental insurance providers consider implants to be a cosmetic treatment and therefore will not cover the entire expense of the surgery. However, they may still pay for some of the prep work involved in getting the implants placed.

The good news is that there are many different ways to help pay for the cost of dental implants. Besides using funds in your health savings or flexible spending account (FSA) to reduce your out-of-pocket costs, there are also healthcare financing options, like CareCredit. These plans work similarly to loans but without a credit check and typically have a lower interest rate. You can also speak with your dentist about in-house payment plans that will allow you to spread out the cost of the implant over time.

Are Dental Implants Affordable?

Many patients worry about the cost of dental implants, but it is important to remember that they are a long-term investment in your health. Dental implants offer the most natural-looking, feeling, and functioning tooth replacement available today and will last a lifetime when cared for properly. They are also much more affordable than other tooth replacement options such as dentures and bridges.

The cost of a dental implant depends on the type of tooth being replaced and other necessary procedures. For example, a bone grafting or sinus lift procedure is often required to ensure that the jawbone is healthy enough to support the implant. This is an additional cost that must be factored into the overall treatment plan. Additionally, if the teeth being replaced are visible in the mouth (front teeth), it is usually more costly than replacing a back tooth.

Once the initial consultation has been completed and the detailed treatment plan has been prepared, a final cost estimate will be provided to the patient. This will include a breakdown of all the individual components of the dental implant including the implant, abutment, and crown.

Depending on the insurance provider and the policy coverage, some of these costs may be covered by the dental insurance. In addition, there are a number of healthcare financing options such as savings accounts, flexible spending arrangements, and even monthly payment plans that can help to make the dental implant cost more manageable.

The bottom line is that dental implants are a great value and they are the preferred tooth replacement option for most dentists, patients, and insurers. If you would like more information about the dental implant cost, please give us a call or schedule a free consultation online. We look forward to hearing from you!

How to Get the Most Out of a Kitchen Remodel

Kitchen Remodel Tacoma can increase your home’s value and transform your space into the perfect cooking and entertaining area. However, these projects can be expensive and require a substantial investment of time.

Kitchen Remodel

Be realistic about your budget and include a contingency fund. Splurge strategically on the items that will have the most impact and cut costs where possible.

One of the biggest determining factors in a kitchen remodel is the budget. While some homeowners are tempted to spend more than they can afford in hopes of boosting their home value, this is rarely a wise financial decision. Generally speaking, kitchen upgrades that cost less than 10% of your home’s overall value offer the best return on investment.

Labor accounts for a huge chunk of kitchen remodeling costs, so it’s important to find a remodeler who is willing to work within your budget and help you cut expenses where possible. For example, painting your own cabinets, refacing existing ones or using particleboard instead of plywood where it won’t be seen can make a big difference in the final cost of a project.

Countertops are another major expense, and while granite is still the popular choice among many homeowners, there are more budget-friendly options like Corian, concrete or laminate. Flooring is also an important cost to consider. Vinyl, linoleum and laminate flooring is cheaper than hardwood or natural stone tile but still provides a modern look.

It’s also a good idea to leave at least 20% of your kitchen remodeling budget in reserve for unanticipated costs. You may encounter costly surprises such as plumbing or electrical issues that were not discovered prior to tearing out walls, or you might need to run water or electricity lines to an area of your kitchen that was previously not planned on.

Design

Once a budget is set and the scope of the remodel is determined (whether it’s a cosmetic makeover or a gut job), a design plan can be created. Designers offer many services, from simple sketches and computer-aided drafting to 3D animation and virtual reality. Some designers charge a flat fee, while others may include their designs in the cost of certain products, such as cabinets or appliances. Be sure to ask about these costs when interviewing professionals.

A mid-size kitchen remodel usually starts with demolition, or “demo,” which exposes the walls and subfloor, allowing for utility work like new drywall and changes to plumbing and electrical circuitry (if necessary). Next, framing changes are made, including adding windows, moving or removing walls and possibly extending ductwork.

When the wall structure is ready, the installation of cabinets and countertops begins. Depending on the size of the room, this can be a major undertaking that requires heavy equipment and professional help.

This is also the time to decide on the materials for the kitchen. Countertops are an expensive element, and choosing a material that is not only durable but that fits with the design can be a difficult choice. For example, a bold backsplash can be fun, but it may not work with a tile floor or with your paint color scheme. Keeping it in mind will ensure that your remodel looks cohesive and intentional.

Layout

The layout of your kitchen is a vital part of a successful remodel. You want to be sure it is functional and fits the needs of your family. A good designer or contractor will be able to assess your current space and advise you on whether it is working well or can be improved by changing the layout.

There are a number of different layouts to choose from, including galley kitchen designs, L-shaped kitchens and U-shaped designs with a peninsula. Each has its pros and cons. You also need to take into consideration natural light. For example, if you have windows in your kitchen you need to be sure that they are properly placed to maximize light and allow for the best workflow.

Another factor that influences the layout of your kitchen is how it will be used. Your designer can help you decide which layout will be most appropriate for your family’s unique lifestyle and work habits. This will involve examining how your family uses the kitchen, such as who cooks most often, does anyone entertain in the home and if there are any members of the family with special needs that may require adaptations.

A fresh kitchen layout can make a huge difference to the way your kitchen works. It can prevent tripping hazards and improve workflow. The goal is to create a practical, functional space that meets your family’s needs and fits seamlessly with the rest of your home design.

Materials

When it comes to kitchen remodels, the materials you choose will have a huge impact on your project’s success. It’s important to consider all your options and budget carefully when choosing cabinets, sinks, countertops and backsplashes, floors, lighting, and appliances.

Cabinetry is a big part of the total cost, and it’s critical to choose durable materials that will stand up to moisture and daily wear and tear. For example, plywood resists water effectively and is easy to repair if damage occurs. However, it may not be as attractive as solid wood.

Countertops are another major investment, and it’s worth focusing on quality to get the most value out of your dollar. Look for granite or quartz that will withstand stains, acidic liquids and everyday wear and tear. Other natural stone materials like slate, travertine and limestone are also gaining popularity. If you’re on a tighter budget, try a poured concrete countertop that can be customized to fit your space or a more affordable porcelain option.

Backsplashes are a great way to add a splash of color or texture to your kitchen, and they’re also an effective way to protect the walls from grease and grime. They can also be used to create a custom design element, such as a unique pattern or a backsplash that incorporates the same material as your countertop. Also, don’t forget to consider energy-efficient appliances that can help lower your utility costs.

Appliances

A new kitchen can transform the heart of your home and make it a place you want to spend time in. Often a remodel includes new appliances, but it can also include changes to the layout and organizational changes. The appliances you select can significantly impact your remodeling costs. Some of the factors you will be weighing when choosing appliances include energy efficiency, quality, price and warranty. If you’re planning on purchasing a new refrigerator, dishwasher, cooktop or oven, it is best to start shopping early in the remodeling process.

Kitchen remodeling can be a great opportunity to upgrade your appliances to more eco-friendly models. While these devices may be pricier upfront, they offer long-term savings in energy bills. Another option is to consider using sustainable materials for your flooring, cabinets or countertops. These options will add value to your home and attract homebuyers if you decide to sell it in the future.

Choosing the right appliances for your remodeled kitchen can be challenging. You will need to decide on a design, color and style that fits your aesthetic. You can find a variety of different styles, colors and sizes of kitchen appliances online or at a local store. It is recommended to consult a Kowalske designer, who can show you the most popular products and colors. In addition, you will need to consider the size of your kitchen, the amount of storage space and the electrical requirements of your appliances.

Financing

A kitchen remodel can require significant financial investment. Depending on the scope of your project, it can range from what Ariana Lovato calls a “basic cosmetic refresh” to a complete overhaul that involves tearing down walls and reconfiguring the layout (which may necessitate permits).

To determine the best financing options for your kitchen renovation, consider the total cost of the project, how long you intend to finance the loan, and the repayment schedule. It’s important to keep in mind that credit cards limit you to a maximum lending amount, and carrying a balance may incur costly interest or annual fees. In addition, credit card debt can affect your credit score, so you’ll want to make sure that you select an affordable borrowing option that will allow you to repay the loan over time.

Personal loans and home equity loans/lines of credit are more flexible options. They typically have lower interest rates than credit cards, and they can be used for any type of improvement project. However, they are secured by your home, so you’ll need to have sufficient equity to qualify and you may be required to have cash on hand for closing expenses.

Finally, several government programs offer loans or grants for homeowners who are remodeling their homes. These typically come with strict eligibility requirements, and they can be more time consuming to apply for. Once you’ve decided how to finance your kitchen renovation, prepare any necessary documentation and submit your application.