Metal Roofing Winston Salem is gaining popularity among homeowners for its durability, energy efficiency, and modern aesthetic. However, installing a metal roof can be intimidating.
Start with a realistic budget for the entire project. This includes the cost of the panels, fasteners, underlayment, and accessories.
Ensure that all materials are compatible with your panel type and color choice. Use appropriate clips and fasteners, and consider a synthetic underlayment that is designed to handle high temperatures.
1. Durability
When it comes to durability, metal roofs are a proven winner. With an expected lifespan of 50 to 75 years, their resiliency and protective coatings stand up to extreme weather conditions. Metal resists UV rays, and can endure hail, high winds, ice damming, and snow accumulation.
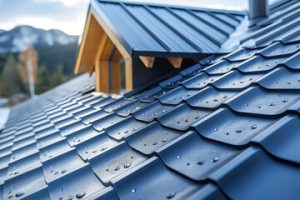
Standing seam metal roofing has a clean modern look that fits well with homes and buildings looking for a stylish yet durable option. Corrugated metal panels, on the other hand, are ideal for sheds, barns and other buildings aiming for a rustic or industrial aesthetic. Both options are resistant to rust and fire, making them an ideal choice for areas prone to wildfires or facilities that store flammable materials.
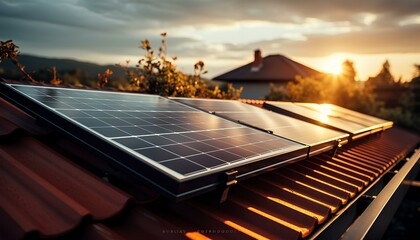
With a reflective surface that can help to reduce the amount of heat absorbed by your roof, metal roofing helps to keep your energy costs down in warmer months. The energy efficiency of a metal roof can also contribute to lower cooling costs when coupled with solar panel installation.
Unlike shingles that can rot or crack, metal roofing is extremely durable and requires minimal maintenance and upkeep, making it a great long-term investment. However, like any roof system, it is still important to conduct regular inspections and repairs to avoid water leaks or other problems.
2. Energy Efficiency
Most people don’t think of metal roofs as being particularly energy efficient, but the reality is that they are. Steel roofing reflects UV rays from the sun rather than absorbing them, and that can help keep homes cool without having to crank up air conditioning. In the long run, this can significantly reduce home cooling costs and help to lower energy usage overall.
In addition, many metal roofing options have reflective coatings that can further aid in lowering energy bills by keeping homes cooler during hot summer months. This can result in significant savings on cooling costs compared to traditional roofing materials like asphalt shingles.
Energy efficiency is an important factor for most homeowners, as it minimizes the amount of energy used to heat and cool homes, which helps save money while also contributing to a more sustainable and eco-friendly lifestyle. Moreover, the more energy that is saved, the less impact a building has on the surrounding environment.
Because of their longevity and durability, metal roofs can be a great energy-saving choice for any homeowner. However, it’s worth noting that maximizing the energy-efficiency of metal roofs will require regular maintenance and inspection. This includes removing any debris that may accumulate, ensuring that fasteners and rivets aren’t loose, crooked, or angled, and re-applying any sealants as needed to maintain their integrity. These tasks are easy to perform, but they are essential for the proper functioning of a metal roof system.
3. Low Maintenance
Aesthetic Versatility
Unlike asphalt shingles, metal roofing can come in various colors and styles to complement any architectural design. It can also be combined with a variety of accessories and trim to further enhance its visual appeal. These features make it an excellent choice for homeowners who want a modern or classic look, as well as business owners looking to increase the curb appeal of their buildings.
The durability and energy efficiency of metal roofs can also save building owners money by lowering their cooling costs during the summer. Its reflective properties help reduce the amount of energy needed to keep a home or building cool, which in turn can significantly lower utility bills. Depending on the color and material used, metal roofing can also provide excellent sound insulation.
When it comes to maintenance, metal roofs require less work than other traditional roofing materials. However, it is still important to perform regular inspections to identify potential issues before they become serious problems. This includes checking for signs of rust, which can be removed with a wire brush and treated with a rust-inhibiting primer. In addition, it is a good idea to check that any pipes, chimneys, or vents that penetrate the roof are protected by flashings, boots, or collars, and that they are not cracked, broken, or leaking. It is also a good idea to inspect screw holes regularly, as the metal can expand and contract over time, causing screws to loosen.
It is also a good idea to have professional roofing contractors inspect roofs regularly, as they can catch problems before they cause damage and/or leaks. This is especially important if the home or building is located in an area that experiences severe weather conditions. In these cases, the roof may need to be re-sealed.
4. Versatility
Aesthetics:
With a variety of color options, panel styles, textures and patterns, metal roofing offers homeowners the ability to create a stylish, custom roof that reflects their personal tastes and architectural style. In addition, a durable metal roof can enhance the value of the home and add curb appeal.
Environmental demands:
The climate and environment in a region can impact the type of metal roofing selected for a property. Areas prone to hurricanes, for example, may benefit from roofing materials with high strength and wind resistance. Additionally, certain metal roofing materials have insulating properties that can help reduce cooling costs in warmer climates.
Budget constraints:
While a metal roof is often a more cost-effective choice in the long run, upfront expenses can vary by material and design complexity. To avoid over-stretching the budget, it is important to weigh these initial investments against potential savings on energy costs and maintenance requirements over the lifetime of the roof.
Design:
The aesthetic of a roof should reflect the overall style of the home and compliment any other exterior finishes, such as window treatments and siding. Metal roofing is available in a variety of colors and panel styles that can complement any style of architecture, from sleek and modern to traditional. Additionally, many types of metal roofing offer the ability to achieve a textured appearance or simulated wood, slate or tile.
Choosing the right metal roofing material is an important investment for any homeowner. It is crucial to select a product that has been properly tested and labeled for durability, weather resistance and energy efficiency. A reputable metal roofing manufacturer will be able to provide detailed information on their products, including testing results and installation protocols specific to the regional climate.
5. Longevity
Metal roofs typically have a lifespan of 50-70 years, though their longevity can be significantly affected by a variety of factors. A lot depends on the specific metal roofing material and the environmental demands of a particular building site, as well as the installation details.
The longevity of a metal roof can also be impacted by the design details that go into it. For example, a standing seam roof with concealed fasteners will have less risk of fastener corrosion and seam failure. The choice of metal for the roof is also important, as certain types are more resistant to rust than others. The slope of a metal roof is another factor that can affect its longevity. A steep slope drains water quickly, whereas a low pitch can cause ponding water that erodes the roofing materials.
A good quality paint job will also contribute to a metal roof’s longevity. Most manufacturers provide a paint finish warranty that lasts 35-40 years, though these warranties can be limited by the type of metal and profile chosen.
Choosing a metal roofing material with a high Class A fire rating is a great way to add additional peace of mind. These metals have a lower melting point than other materials and are able to withstand fire better than shingles, so they’ll be less likely to burn and melt.
A regularly scheduled inspection program is an excellent way to keep a metal roof in tip-top condition. These inspections will help to catch issues like loose screws and compromised seals that could lead to water infiltration. This will prevent any serious damage and ensure that the roof continues to perform its protective function.