Chain Link Fence Summerville is a popular backyard choice because it provides plenty of security at an affordable price. It’s also a great option for homes that back up to each other and need an easy way to split outdoor space.

The main components of chain-link fencing are steel wires woven together to create that familiar diamond pattern. The wires are often galvanized or coated with vinyl to reduce rusting and improve durability.
Chain link fences offer a blend of security and visibility, making them an ideal option for deterring vandalism, theft, and other forms of unauthorized entry. Moreover, these fencing systems can be easily enhanced with a variety of security features to improve their protective capabilities. For example, incorporating intrusion sensors and alarms can detect vibrations caused by intruders attempting to penetrate the fence. This can then trigger an alarm to alert you, giving you time to react and stop them before they’re able to gain access.
Moreover, these fences are often equipped with barbed wire or razor ribbon at the top to further deter climbing attempts. This can be a useful addition to any chain-link fence, particularly those used in areas where heightened security measures are required such as prisons and military installations. These security enhancements can also help ensure the safety of occupants within a facility, reducing the likelihood of accidental injuries and other accidents.
Additionally, integrating a chain-link fence with perimeter detection systems can detect unauthorized intrusions or breaches along the fence line, triggering an alarm to deter intruders and facilitating post-incident investigation. These systems can be further enhanced by incorporating access control mechanisms such as locks, keypads, or card readers to limit access to authorized personnel only.
Aside from incorporating a perimeter intrusion detection system, you can also improve the security of your chain-link fence by incorporating motion-activated lights. Choose lights with adjustable sensitivity settings to avoid false alarms caused by small animals or natural movements. Regular maintenance and testing will help ensure consistent functionality and reliability of these security features.
You can also enhance the security of your chain-link fence by installing anti-cut fabric. This material is engineered to resist cutting and can be customized with a variety of selvage types, including knuckle and twist. Slats can also be inserted into the fabric, offering different degrees of privacy and adding to the aesthetic appeal.
Lastly, a chain-link fence can be topped with thorny bushes to further deter trespassers and other unwanted visitors. These bushes can be planted close to the fence and should be trimmed regularly to maintain their thickness, which acts as a physical deterrent against trespassers.
Durability
Chain link fences are a durable option that can withstand the elements. A quality fence, made with top-notch materials and properly installed, can last for 20-30 years or more. However, not all chain fences are created equal. The difference between a chain link fence that stands strong for decades and one that succumbs to the elements is often in the details. The key to a lasting chain link fence is finding a supplier with high standards of quality. This ensures that every fence sold and installed by the contractor is a testament to craftsmanship and strength.
The durability of a chain link fence is due to its woven structure of interlocking steel wires and galvanization to resist rust. Modern welding techniques are also highly developed, resulting in robust joints that are stronger than the wires themselves. A reputable manufacturer will also be committed to thorough quality control, testing each link to guarantee that the finished product is a robust and durable barrier.
Unlike other types of fencing, chain link fences don’t require staining or painting over time, saving you on yearly maintenance costs. The durable design of a chain link fence also means that it is more cost-effective than alternative fencing options when considering installation and material costs.
While the durability of a chain link fence is impressive, it does have certain maintenance requirements that must be met. This includes regularly inspecting the fence for signs of rust or physical damage and taking prompt action to repair any issues that arise. If left unchecked, a damaged or rusted fence will not protect your home or yard the way it should, and it can pose a safety risk to children and pets.
Other maintenance tasks include regularly cleaning your fence with a wire brush and water to remove dirt and debris. It’s important to do this periodically, especially if you live in an area with heavy rainfall or severe weather. In addition, it’s a good idea to trim vegetation regularly to prevent plants from growing into the fence, which can damage or weaken it over time. Finally, it’s a good idea to apply a rust-resistant coating or paint to your chain link fence to further protect it from harsh environments and the weather.
Curb Appeal
Aside from providing security, chain link fences can also enhance the overall look of your yard. Their industrial design can appear cold and uninviting, but homeowners can turn this to their advantage by implementing decorative features that add personality and appeal.
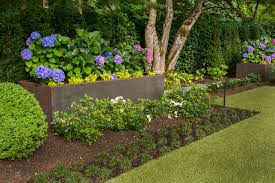
A simple way to dress up a chain link fence is to plant flowers, vines, or other greenery along the top. These plants will not only add beauty to your yard but can help create a sense of privacy, as well. A popular option is to use clematis, which are low maintenance and have beautiful colors.
Another great way to enhance the look of a chain link fence is to install privacy slats. These are available from many fencing companies and can be easily installed on the chain link fence. They are made of a variety of materials, including wood and vinyl, and come in varying sizes to suit different needs. They can be placed vertically or horizontally on your chain link fence, and are sure to add some curb appeal.
Other decorative options include the use of string lights on a chain link fence. These lights can add a beautiful twinkling effect and provide illumination throughout the night. They can be woven through the chains or draped over them to add a whimsical touch.
Painting a chain link fence is another easy and cost-effective way to improve its aesthetics. Paints are available in a variety of colors, from crisp white and sleek black to earthy shades like sage green and forest brown. Choosing the right color can really make a difference in how your home looks and blends with the surrounding landscaping.
If you’re feeling creative, there are also several ways to decorate a chain link fence with items like ribbons, yarn, beads, and flags. You can even hang banners that feature your favorite team’s colors or logo to show off your fandom and bring a personal touch to your home.
Finally, if you’re looking for a more permanent solution, consider the use of wooden elements on your chain link fence. Some fencing companies offer bamboo panels that can be wired into the chain link fence and are available in a number of styles and heights. This can camouflage the chain link and make your home more attractive to potential buyers.
Privacy
A chain link fence is a popular choice because of its affordability, durability, and minimal maintenance needs. It’s perfect for keeping pets safe and delineating property boundaries without obstructing views or blocking sunlight. However, it’s easy to climb and doesn’t provide privacy, which can be a concern for homeowners. Fortunately, there are a few creative ways to improve your chain link fencing and create a private backyard oasis that’s functional and aesthetically appealing.
A common way to add privacy to a chain link fence is by filling the diamond pattern steel wire with slats made of aluminum or high-density polyethylene. They’re easily installed and offer 75 to 80 percent visual blockage to create a sense of privacy for your yard. They come in a bag of around 78 slats for a six-foot-high fence, and cost about $60 to put up.
Another option is to cover a chain link fence with vinyl, which has a natural look and comes in a range of colors. It’s also available in a self-locking format, making it easier to install and maintain. A vinyl privacy fence doesn’t require staining, either, so you can save yourself the time and money it takes to repaint or re-stain.
If you’d prefer a more green aesthetic, consider using trellis supports or incorporating tall bushes or fast-growing vines into your chain link fence. Bamboo screens, for example, are a natural way to add privacy and can be installed on the side of your fence or in between the posts. Bamboo grows quickly and offers an exotic touch to your backyard, and you can plant flowers or other vegetation to obstruct your view from the other side of the fence.
Remember to prune and trim your plants regularly to promote healthy growth and prevent overgrowth that can impact your privacy. Also, keep an eye out for rust spots or holes that need repair to ensure the integrity of your fence and privacy enhancements. Keeping your fence and plants in good condition will keep you protected from predators and critters and give your yard a clean, finished appearance that’s attractive to both family and guests.